Tuesday, 26 February 2013

Kids Style (a warm welcome)


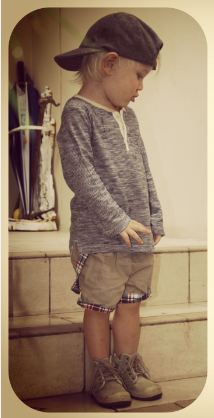
So i'm a little bit excited to announce a new addition to Lil Mumsy blog.  The aim is to kick it off in the next few weeks.  "Kids Style" will be the name of the new section which will feature different, collaborative and interesting styles dressed up by children under 12 (most probably my own, for convenience sake).

It'll be a collaboration between myself and Sami Lorking-Tanner, whose photography, i'll admit, I have a huge crush on.  As a team, i'll be directing and styling while she takes all the photos and makes them perfect! Shall be interesting...you know what they say, "never work with dogs or children"..oops.

So i've got my fashionista hat on and am working to inspire Mumma's with a whole lot of ways to dress up their kids.  With winter coming, we'll have a lot more fun..no more nudy bums!  This launching pad will be all about vests & scarves, socks & sneakers - made to look rad by a bunch of very trendy children.  Woot woot! Can't wait.

Keep an eye out for 'Kids Style', it's coming reeeaal soon... 


Read more...

Sunday, 17 February 2013

Gabe's 'Dr Seuss' 2nd Birthday

I didn't get around to posting these sooner but here are the photographs from Gabe's 2nd birthday party. I themed it 'Dr.Seuss' since Gabe was all about the Dr.Seuss books at the time. He LOVED 'The Cat in the Hat', so I made sure we had a massive wall feature of him, along with a whole heap of balloons which I knew would be a hit amongst a party full of 2-year-old's. I got a lot of my inspiration from different blogs and pinterest accounts, took some other ideas off Etsy and managed to pick up some decorations and things from the Dr.Seuss website which made it easy. The rest of it I just thought up and put together the morning of the party - Funny that, how you always manage to come up with your best ideas under pressure...


Photographer: Hemma Kearney

Read more...

Thursday, 14 February 2013

The Brown's Patch


The addition of a small, quaint vegetable patch built to one side of the Brown's backyard brings to life a space that could easily have been, nothing special.  But this is special and was designed & called upon by creative Mumma and kids clothing designer, Mrs Kobi Brown.

I'm in love with her simple, creative yet cost-effective style.  She nails it, quite literally, every time. Kobi's a do-er, she gets things done. She just does, she's one of those super mums who seems to manage it all..and some.


Kobi designed this gorgeous little garden to house a combination of vegetables including corn, cucumber, beans, strawberries and spinach.  She only has one regret, "I probably over did it, too many fruits and veggies for such a small patch..atleast i'll know for next time." To me it didn't seem over done at all. It was pretty perfect actually but I guess Kobi thought it needed to be more spaced out, because the garden has grown bigger than she expected and will obviously continue to grow.

The frame of the vegetable garden was built by a friend of the Brown's who put it together by using recycled wood.  They went for a sort of 'zig zag' design which you can tell from the photographs.  There wasn't really any reason for this, Kobi decided on it because it looked like more fun than the straight up and down look.  Clearly it did the job since all the veggies seem to be thriving!


Beautiful, two-year-old, Harvi Brown, Kobi's daughter introduced us to her little garden before grabbing a huge cucumber from the front of the patch.  They've already got corn, spinach and cucumbers ready to be eaten and it's only been in action a couple of months.  


Young Harvi's loving her little veggie garden and as Kobi said, "she really likes it, I think it's given her a sense of responsibility which has definitely been a good thing."  Harvi even has her own job, watering the garden, which from what I could tell, she was pretty good at! Kobi laughs as she tells us, "Harvi almost loves it too much.  She never wants to stop watering so i'll often have to intervene before she ends up drowning the whole thing."


Gardens for children are a good learning tool, I think.  Because although they may not fully understand what's going on, they're able to process the growth and development of their own mini project.  They have a job and they come to realise that when the job is done, they'll be rewarded...with fresh, homemade fruits and vegetables that they can chow down on.  It doesn't take much to teach a child what their little hands are capable of.


Photographer: Sami Lorking-Tanner


Read more...

Monday, 11 February 2013

True love


 No posts since my son arrived, I apologise.  I've been run off my feet physically and emotionally - not in a bad way. Actually i've been in a bit of a dream state and have felt slightly out of it for the last few months(thank you baby Milo for your love of food and constant, through the night, NEED to feed). Alright, i'm being a bit unfair, he's getting a whole lot better.  Hence, the reason i'm able to structure a sentence and attempt to piece together a blog post.

I feel like I haven't really stopped since Milo was born (cooking, cleaning, feeding, changing..the list goes on). The last few months have been a huge challenge.  I sometimes  feel like i'm on that show 'Gladiator', just PUSHING through, trying to make it through the next hurdle.  There's just so much going on and after days of getting on with it, having had barely any sleep, you do start to feel like you could just collapse..on a bed..a big cloud like one..and forget that anything else exists. Hmm...That's not going to happen, not with a toddler who would quite happily rip the interior of your house to shreds while you slept and a 2-month-old who is completely and totally dependant on you.  No, no such luck. Not this time around.. 

It's hectic, it really is but to be totally honest, i've found it pretty difficult to actually bring myself to complain.  Yeah, I feel exhausted a lot of the time and my patience definitely gets tested but these kids!! They're just so incredibly LOVEABLE & SQUEEZABLE i'm having trouble unravelling myself from around their little fingers. They just do it for me, their cuteness just makes me melt every day of the week. I'm 110% in love.

Somehow I think i've managed to land myself a pretty sweet deal. I've basically sacrificed everything for my boys and in return I get the joy of so many incredible, heart melting moments. Sure it's been tough but for everything i've given, it's come back, tenfold and I couldn't be more grateful.   

Speaking of 'gratitude', here's one other thing i'm grateful for, the people holding me up.  My support network, my friends and close family, these are the people i've got to thank for my sanity! How could I have honestly done it without you? Well that's a rhetorical question, obviously, since we all know I absolutely couldn't have. I'm one lucky duck, getting a whole lot more than I deserve. 

 I really don't know what I did to deserve it but I seem to have pulled together the most special collection of friends, an amazing family and these two beautiful boys who have taught me what it truly means to be in love.  These little beings have managed to change me and help me see the world through shiny, new shades - Life's looking bright! And i'm going to start giving A LOT more back to the universe in return for being dealt such a damn good hand! 

I think what's helped me open my heart the most, is no longer doubting the existence of love, 'true love'.  I believe now and that's reassuring. Love is real.  I think it gives one peace of mind to know or even just believe that love exists.  It's nice to know that something with some sort of significance is out there, it's real and it's at your fingertips.

I can't believe we created what we have, Luke & I. Brothers. Oh, the joy! Two little boys who'll forever share that bond, that blood that is theirs and theirs alone.  I love that I could give them that, a connection that will always be beyond my comprehension.  At the moment it's so pure and I pray, I pray, I pray that it continues that way.

These are my son's and the most beautiful souls I know..


Read more...

Wednesday, 10 October 2012

Things that matter most


It's taken me almost 6 months to put pen to paper and get this post done.  I'd be lying if I said I didn't have the time to write it earlier, I could have found the time.  What I didn't have was the motivation, the inspiration or the desire to share any longer.  I created a cocoon, sort of, which is where i've been hiding my emotions, fears, stresses and even all the good - my ideas, creativity and enthusiasm.  It's been on hold from the rest of the world and now I want to start giving again.  I want to share what i've got and I think i'm finally in the right head space to do so.

I've been on a short, but long journey over the last few months, coming to terms with the discovery of a new child (my child) who will soon be making its way into this wide world of ours.  The thought alone of managing a newborn, on top of a toddler was enough to send me straight into a panic.  The anxiety, in a way, caused me to freeze up and discontinue what I had been working towards.  It made me second-guess and re-consider everything that I was doing.  Was it worth it? Was it possible? Was ANYTHING possible now that i'd be committed to raising not one, but two children? Obviously, the answer is yes.  Of course it is possible, everything is possible but at the time, I let the stress get the better of me.  I let it tell me that this was not going to be okay, that my sanity and my freedom would no longer exist and that my hopes and dreams could basically be written off.  I was wrong, I know that now but it was the way I felt and it's what I went through, in my mind, over the months leading up to now.

I think the major turning point for me was during my 20-week scan.  It was in those few hours, seeing moving 3D images of my baby on a screen that I was able to see the light.  For the first time I felt true love rather than angst and uncertainty towards my unborn child.  It was then and there that I realised this was not a bad thing at all.  This was a good thing, a really, really beautiful thing.  I was not only going to have one, but two of what I love most in this world...my son.  How could that ever be a bad thing?

As this pregnancy has progressed, it's become more and more clear that this isn't about me.  It's about them.  It's about my children and their need to be nurtured.  It's not about my most desired career path and lack of freedom.  Yes, these are things I might miss out on and may have to sacrifice, but those losses are nothing compared to what the kids will gain from my choice to be a loving, dedicated and nurturing mother.  My focus is now on my children, both of them and everything else needs no other place than to be on the outskirts.  It was all very confusing until I allowed my intuition to tell me what was most important.  As soon as that was clear I could push aside, quite easily, all the things that trailed behind.

Everything with great importance to you should always, always take precedence. That's what i've learned over the last few months and I wanted to share it with anyone who's struggling internally, as I was, to piece together the various aspects of their life.  All the parts to the puzzle do fit, I promise, you just have to know where to put them.


Read more...

Thursday, 19 April 2012

DIY wall deco

    
Beaded Name Letter For Children's Bedroom

Materials

Stencil of the 1st letter of child's name
Beads
Pencil
Super glue
Scissors
2 plain sheets of white paper
Large frame

Instructions

 1. Draw around the letter stencil with a pencil
2. Organise your beads within the letter so you know where you want to stick each of them
3. lift each of the buttons up one by one and super glue them to the white paper (try to leave a tiny bit of space between the buttons and the pencil line)


 4.  Once all of your buttons are glued on, cut around the edge of the letter, following the pencil line (this is why you don't want your buttons covering your pencil line)
5. Glue your letter cut-out into the center of a fresh piece of white paper.
6.  Once the glue has tried, transfer your new sheet of paper (with beaded letter) into a frame that matches both your buttons and your child's bedroom decor.


I got this cute idea from an awesome blog I saw a while back but can't remember the URL for the life of me! If you happen to stumble upon this blog please email me because she has a lot of other great DIY ideas for both kids and decorating.  In the meantime, have fun with this one!


Read more...

Thursday, 12 April 2012

Easter Cupcakes


Apologies for posting this after Easter, i've only just managed to emerge from my food coma.  Here's a cute recipe for next Easter...

Coconut & Vanilla Cupcakes

Ingredients

Makes: Approx 24 cupcakes

150g unsalted butter
1 1/2 cups Caster Sugar
2 eggs
2 tsbs vanilla essence
2 1/2 cups self-raising flour
1 1/4 cups milk

Coconut Frosting

250g spreadable cream cheese
3 tbsps unsalted butter, softened
1/3 cup soft icing mixture (CSR is one brand)
3 tbsps coconut cream
1 cup shredded coconut, toasted
Mini Easter eggs

Method

In a bowl beat butter, add sugar then cream the butter and sugar together.  Add eggs and mix well.  Add vanilla, flour and milk.  Beat until smooth.

Line a muffin tray with paper cases, pour in miture until they are about two thirds full.

Bake in the oven at 190oC conventional (170oC fan forced) for 20 minutes or until golden.

While cupcakes are cooling on a wire rack, prepare frosting.

Frosting

Beat together cream cheese and butter with an electric mixer.

Add soft icing mixture and coconut cream then gently mix until combined

Beat on high for 2 minutes until light and fluffy.

To Decorate

To toast coconut, spread a thin layer on a baking tray and place under the grill at 180oC conventional (160oC fan forced) for about 5 minutes, stirring occasionally until light golden and even in colour.

Pipe a circle of frosting on to the tops of cooled cupcakes.

Sprinkle with toasted coconut to create nests.

Place three chocolate Easter eggs in the middle of the coconut nest, place on a platter and serve.

Note

Different flavours, such as lemon & orange can be used for this recipe as well.  All you have to do is substitute the 1/4 cup of milk for a 1/4 cup of lemon or orange juice.


Read more...